Getting Started
Getting Started
Prefer to watch the video? Click here
Prefer to watch the video? Click here
KIT CONTENTS
Collection
Device
Collection
Tube
Tube
Protector
Blue
Gauze
Green
Alcohol Wipe
Black
Bandaid
Rythm
Heatpack
Sample
Bag
Return
Mailer
NOTE
Collect and send your sample within 5 days of receiving your kit to ensure the lab gets it within 1 week. You can expect your results within 7 days of the lab receiving your sample.
1
Wash your hands, then take each item out of the white Rythm bag and place them in front of you.
Tip: Use the mailer bag to put your trash in as you go.
2
Write the date and time you are completing your collection on the back of your orange sample bag.
3
Tear open your blue gauze, green alcohol wipe, and black rythm bandaid so they are ready when you need them.
4
Open your collection device package by peeling off the cover.
Tip: Look for the red button
5
Take the clear cap off the red button on the collection device and place your device down on the surface in front of you.
6
Remove the green lid from the collection tube by twisting and pulling away.
7
Push the raised opening of your collection tube into the bottom of your red button collection device.
The green line should be facing outward below the red button.
8
Pick up your green alcohol wipe and clean between your shoulder and elbow.
9
Pick-up your circular heat pack and put your thumbs on the raised side of the silver coin and pop it like bubble wrap.
The gel should crystallize. You may need to pop it back-and-forth multiple times.
Tip: Don’t try and break the coin.
If you are having trouble, watch the instruction video for a visual.
10
Set a timer for 4 minutes and hold your heat pack just above your tricep until the time runs out.
Tip: If it gets uncomfortable, remove heat pack for a few seconds then put it back.
If your heat pack does not work, you can rub your arm with your hand until it is warm.
11
Peel the sticker off the back of your red button collection device and stick the device just above your tricep.
You don’t need to hold the device; it will stick to your arm.
Make sure the collection tube is pointing down your arm toward the floor.
Tip: Hang your arm down by your side and relax.
12
Press the button all the way down with two fingers until you hear a click, then release.
It’s painless, so you may not notice – only press the button once.
13
Set a timer and fill the microtainer above the white label.
Do not stop at the lower markings; the microtainer must be completely filled for accurate testing.
Keep watch: It is normal for blood to either appear immediately or take up to 5 minutes.
Tip: If blood does not appear after 5 minutes try pressing the button again.
Note: If 10 minutes has passed and the tube is only partially filled, complete steps 13 - 18 and then text the rythm team at +1 (866) 740-3447.
Do not ship back to us if the tube partially filled.
14
Remove your device by peeling from either side.
Note: there is no needle–you are just peeling the sticky adhesive off.
Tip: To avoid spillage place the device red button facing down on the surface in front of you.
15
Raise your elbow to a 90-degree angle, put the gauze on the collection area, and apply pressure for 1 minute.
16
Apply your black rythm bandaid and leave it on for 24-48 hours for rapid healing.
17
Remove your collection tube by twisting and pulling down.
Don’t worry it will not spill easily.
Note: Overfilling is okay, please do not pour blood out of the tube.
18
Push the green lid back onto your collection tube by pressing down on the top with your thumb.
Push, don’t twist. The lid should snap on.
Tip: To avoid spillage during transit Please make sure the lid is on tight.
19
Turn the collection tube upside down and flick lightly on each side until the blood moves from the top to the bottom.
Invert the tube 10 times.
The blood should move from the bottom to the top with each inversion.
20

Put the sample inside the black rythm tube protector.
21
Place your sample into your orange sample bag.
22
Place your orange sample bag with your sample into the black bubble mailer with the return postage slip.
23
If you cannot mail your sample straight away, you can store it in the refrigerator for up to 3 days.
24
When you are ready to mail the sample, you have three options:
Drop it off at your nearest FedEx or shipping store.
Organize a pick-up by texting the rythm team at
+1 (866) 740-3447.
Note: Pick-ups cannot be organized before 9am or after 7pm PST.
Book a FedEx pick-up
25
KIT CONTENTS
Collection
Device
Collection
Tube
Tube
Protector
Blue
Gauze
Green
Alcohol Wipe
Black
Bandaid
Rythm
Heatpack
Sample
Bag
Return
Mailer
NOTE
Collect and send your sample within 5 days of receiving your kit to ensure the lab gets it within 1 week. You can expect your results within 7 days of the lab receiving your sample.
1
Wash your hands, then take each item out of the white Rythm bag and place them in front of you.
Tip: Use the mailer bag to put your trash in as you go.
2
Write the date and time you are completing your collection on the back of your orange sample bag.
3
Tear open your blue gauze, green alcohol wipe, and black rythm bandaid so they are ready when you need them.
4
Open your collection device package by peeling off the cover.
Tip: Look for the red button
5
Take the clear cap off the red button on the collection device and place your device down on the surface in front of you.
6
Remove the green lid from the collection tube by twisting and pulling away.
7
Push the raised opening of your collection tube into the bottom of your red button collection device.
The green line should be facing outward below the red button.
8
Pick up your green alcohol wipe and clean between your shoulder and elbow.
9
Pick-up your circular heat pack and put your thumbs on the raised side of the silver coin and pop it like bubble wrap.
The gel should crystallize. You may need to pop it back-and-forth multiple times.
Tip: Don’t try and break the coin.
If you are having trouble, watch the instruction video for a visual.
10
Set a timer for 4 minutes and hold your heat pack just above your tricep until the time runs out.
Tip: If it gets uncomfortable, remove heat pack for a few seconds then put it back.
If your heat pack does not work, you can rub your arm with your hand until it is warm.
11
Peel the sticker off the back of your red button collection device and stick the device just above your tricep.
You don’t need to hold the device; it will stick to your arm.
Make sure the collection tube is pointing down your arm toward the floor.
Tip: Hang your arm down by your side and relax.
12
Press the button all the way down with two fingers until you hear a click, then release.
It’s painless, so you may not notice – only press the button once.
13
Set a timer and fill the microtainer above the white label.
Do not stop at the lower markings; the microtainer must be completely filled for accurate testing.
Keep watch: It is normal for blood to either appear immediately or take up to 5 minutes.
Tip: If blood does not appear after 5 minutes try pressing the button again.
Note: If 10 minutes has passed and the tube is only partially filled, complete steps 13 - 18 and then text the rythm team at +1 (866) 740-3447.
Do not ship back to us if the tube partially filled.
14
Remove your device by peeling from either side.
Note: there is no needle–you are just peeling the sticky adhesive off.
Tip: To avoid spillage place the device red button facing down on the surface in front of you.
15
Raise your elbow to a 90-degree angle, put the gauze on the collection area, and apply pressure for 1 minute.
16
Apply your black rythm bandaid and leave it on for 24-48 hours for rapid healing.
17
Remove your collection tube by twisting and pulling down.
Don’t worry it will not spill easily.
Note: Overfilling is okay, please do not pour blood out of the tube.
18
Push the green lid back onto your collection tube by pressing down on the top with your thumb.
Push, don’t twist. The lid should snap on.
Tip: To avoid spillage during transit Please make sure the lid is on tight.
19
Turn the collection tube upside down and flick lightly on each side until the blood moves from the top to the bottom.
Invert the tube 10 times.
The blood should move from the bottom to the top with each inversion.
20
Put the sample inside the black rythm tube protector.
21
Place your sample into your orange sample bag.
22
Place your orange sample bag with your sample into the black bubble mailer with the return postage slip.
23
If you cannot mail your sample straight away, you can store it in the refrigerator for up to 3 days.
24
When you are ready to mail the sample, you have three options:
Drop it off at your nearest FedEx or shipping store.
Organize a pick-up by texting the rythm team at
+1 (866) 740-3447.
Note: Pick-ups cannot be organized before 9am or after 7pm PST.
Book a FedEx pick-up
25
NOTE
Collect and send your sample within 5 days of receiving your kit to ensure the lab gets it within 1 week. You can expect your results within 7 days of the lab receiving your sample.
KIT CONTENTS
Collection
Device
Collection
Tube
Tube
Protector
Blue
Gauze
Green
Alcohol Wipe
Black
Bandaid
Rythm
Heatpack
Sample
Bag
Return
Mailer
1
Wash your hands, then take each item out of the white Rythm bag and place them in front of you.
Tip: Use the mailer bag to put your trash in as you go.
2
Write the date and time you are completing your collection on the back of your orange collection bag.
3
Tear open your blue gauze, green alcohol wipe, and black rythm bandaid so they are ready when you need them.
4
Open your collection device package by peeling off the cover.
Tip: Look for the red button
5
Take the clear cap off the red button on the collection device and place your device down on the surface in front of you.
6
Remove the green lid from the collection tube by twisting and pulling away.
7
Push the raised opening of your collection tube into the bottom of your red button collection device.
The green line should be facing outward below the red button.
8
Pick up your green alcohol wipe and clean between your shoulder and elbow.
9
Pick-up your circular heat pack and put your thumbs on the raised side of the silver coin and pop it like bubble wrap.
The gel should crystallize. You may need to pop it back-and-forth multiple times.
Tip: Don’t try and break the coin.
If you are having trouble, watch the instruction video for a visual.
10
Set a timer for 4 minutes and hold your heat pack just above your tricep until the time runs out.
Tip: If it gets uncomfortable, remove heat pack for a few seconds then put it back.
If your heat pack does not work, you can rub your arm with your hand until it is warm.
11
Peel the sticker off the back of your red button collection device and stick the device just above your tricep.
You don’t need to hold the device; it will stick to your arm.
Make sure the collection tube is pointing down your arm toward the floor.
Tip: Hang your arm down by your side and relax.
12
Press the button all the way down with two fingers until you hear a click, then release.
It’s painless, so you may not notice – only press the button once.
13
Set a timer and fill the microtainer above the white label.
Do not stop at the lower markings; the microtainer must be completely filled for accurate testing.
Keep watch: It is normal for blood to either appear immediately or take up to 5 minutes.
Tip: If blood does not appear after 5 minutes try pressing the button again.
Note: If 10 minutes has passed and the tube is only partially filled, complete steps 13 - 18 and then text the rythm team at +1 (866) 740-3447.
Do not ship back to us if the tube partially filled.
14
Remove your device by peeling from either side.
Note: there is no needle–you are just peeling the sticky adhesive off.
Tip: To avoid spillage place the device on the surface in front of you – red button facing down.
15
Raise your elbow to a 90-degree angle, put the gauze on the collection area, and apply pressure for 1 minute.
16
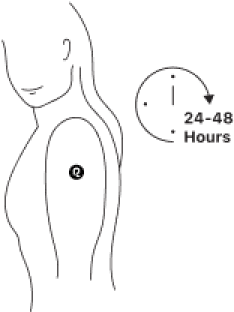
24-48
Hours
Apply your black rythm bandaid and leave it on for 24-48 hours for rapid healing.
17
Remove your collection tube by twisting and pulling down.
Don’t worry it will not spill easily.
Note: Overfilling is okay, please do not pour blood out of the tube.
18
Push the green lid back onto your collection tube by pressing down on the top with your thumb.
Push, don’t twist. The lid should snap on.
19
Turn the collection tube upside down and flick lightly on each side until the blood moves from the top to the bottom.
Invert the tube 10 times.
The blood should move from the bottom to the top with each inversion.
20
Put the sample inside the black rythm tube protector.
21
Place your sample into your orange sample bag.
22
Place your orange sample bag with your sample into the black bubble mailer with the return postage slip.
23
If you cannot mail your sample straight away, you can store it in the refrigerator for up to 3 days.
24
When you are ready to mail the sample, you have three options:
Drop it off at your nearest FedEx or shipping store.
Organize a pick-up by texting the rythm team at
+1 (866) 740-3447.
Note: Uber pick-ups cannot be organized before 9am or after 7pm PST.
Book a FedEx pick-up
25
How was your experience?
How was your experience?
Write a review
FAQ
FAQ
How will this collection affect my training today?
How do I reheat the heatpack?
What if I did not fast for the 8 hours before my test?
How will this collection affect my training today?
How do I reheat the heatpack?
What if I did not fast for the 8 hours before my test?
How will this collection affect my training today?
How do I reheat the heatpack?
What if I did not fast for the 8 hours before my test?
How will this collection affect my training today?
How do I reheat the heatpack?
What if I did not fast for the 8 hours before my test?